May 25, 2013

Flower Motif Bolero

My dear lovely people!

How are you?
I have been a very lazy person of late.Tututut!
Actually somehow my days and nights just seem to merge and i am not able to account for any spare time. The kids are fine, the weather is good, i am being crafty and homely..Somehow i seem to be procrastinating a lot..LOT!

Just enjoying my crafty ventures without wondering if i am actually wasting my time :)


Just enjoying the fact that i am not working and DO NOT have any hard deadlines.

Just enjoying the slow motion of everyday-ness - if there is such a word! and not having to worry about what will go wrong as everything seems to move with its correct time and pace.

Just enjoying my daily chores of dropping my princess to pre-school, playing with my son, picking her up from school along with my son and chasing the birds later...


I tell you its so much fun sometimes not knowing where you are heading. I know in general what i am doing, but right now, its priority kids, home, family, cooking, crafting and since these happen everyday and do not have deadlines or an end date - i am safe!

So i was browsing thru Pinterest - my actual time-eater and came upon this link HERE.
The wonderful lady has written a great tut for making this bolero...I wanted a gift for my 9 year old neice and was looking at a flower bolero/shrug and finally decided on this. I had to modify it highly, right from decreasing 1 round of the motif, to adding an extra row of motifs and many other things..But hey! You got to do what to got to do if you like a pattern right?

I am really happy with the final look...


The sleeve with the details...


The back of the bolero. i used my girl's dress to model it so it might look a bit big, but i am hoping it would fit my niece !!


The bolero comes together by a string on both sides. Girlie and fun!


Have a great weekend and thanks so much for such lovely comments on my first tutorial! It made the effort worth it and made me smile when ever you guys wrote to me! :)))

Love ♥♥♥♥♥♥♥♥♥♥♥♥♥♥♥

May 14, 2013

Tutorial :: Crochet Case/Pouch

Hello my lovelies!

How are you doing today? Can you believe that we are already in the 5th month of this year....where is the time going...Seems like it was just the beginning of the year and already we are in the middle of the 5th...I remember reading all the lovely posts in blogger land about the year end reviews..and it just seems like yesterday :)

The beginning of this year i wanted to use this blogging site to develop my creativity and also provide a few tutorials on the way of my journey...this is a small step in that direction..My first attempt so please excuse any blunders on the way...

Here's what i am trying to make today..This pattern is very flexible, can be done with any thread/yarn and any stitch. Its more of a guideline and your creativity is the limit to what you can do with it!

Warning :: Picture overload to substitute for words :)


Get these things ready
*Crochet swatch in any stitch and measuring any size you like for your pouch/case. Make sure that the swatch is double the length of your desired purse. For Ex: If you want a purse measuring 6" by 4" then crochet a swatch of 12" by 4" and fold in the middle to get a 6" by 4".
*Adequate length zipper.
*Crochet doily of your choice/crochet flowers/mandala/anything you want to add the extra zing to your case :)
*Sewing needle and matching thread.
*Lining fabric.

I used a basic Moss stitch for my purse. There are loads of tuts on the net for the same. I am writing a pattern i used, which i found most comfortable.

Even number of stitches.
I chained 130 stitches using Laura Knitting Cotton and 3.5mm hook.

Row1: 1 SC in 2nd ch from hook, *1CH, skip 1 ch, 1 SC in next ch, repeat from * to end, turn.
Row2: 1 CH, skip first sc, *1 SC in 1 ch sp, 1 CH, skip 1 sc, repeat from *, ending 1 SC in 1 ch, turn.
Repeat row 2 till the swatch measures up to the height you need.


Using a matching thread and embroidery needle, whip stitch the swatch by folding in half and stitching along the bottom only.


Here you can see that i have stitched the bottom part. DO NOT STITCH the 1 open side. This is important as it helps in easy sewing of the zipper.


Now, unzip the zipper and line it to the purse. Make sure you are having the wrong sides (WS) of both the crochet swatch and zipper together. Pin it in place and stitch it using back stitch taking care that big stitches do not come in the right side..


Make small stitches as possible to keep zipper fixed firmly and also to hide the stitches in front view of the purse.

 Do the same with the other end of the zipper too. Take care NOT TO pull the zip thru the entire length of the purse.!!

Now you have attached the zipper to both ends of the purse and you only need to stitch together the 1 side you had left. Remember??


 Now stitch the remaining one side...


Turn your purse inside out and voila!!!
You are done !!!! Well almost :)))


I have the need to line all my purses and bags and blankets...so i used this fabric for lining. Lotsa tuts on the net for this and you should be able to sew/stitch this easily...When you attach the lining make sure it is done over the zipper so that it covers the zipper stitches.


and now for the fun bit. I made a doily and sewed it in place.
You can make anything from flowers, to motifs, use buttons, beads...the options are endless!!


You can make any kinda purse, a few ideas to get you started...

 Rainbow Case

 Granny square in 2 rounds Case

 Blues Case

Phew!!!
Hats off to those who write for us, providing step by step instructions and photos for every single stitch. I have renewed respect for my fellow bloggers today :)


Hope you had fun with this, as much as i did.

Do write in and let me know if you have any questions or need any clarifications :) Love to help you out and hear from you as always..

Love,
xxx

May 13, 2013

Beaded Collar Dress Up!

Hello my lovely people!

A warm welcome to all those who are new here, hope you enjoy your "stay" and i manage to inspire and get inspired by all you talented and awesome crafters :)

How was your weekend? We had a plain one, nothing special as it was really hot here. Hot is fine, but hot + humid + 2 toddlers = 2 tired parents :)) Its funny tho how we complain when it is cold that we need the sun, but when the sun is smiling we are still complaining..tututut!!

Today, i am showing you guys something which is making me reallly real happy! I crocheted something for myself, a little something, i had been eying this for such a long time. But i really did not find a pretty black top as the base for my collar.

Please don't mind the BAD self portrait and just admire the crochet hand work!
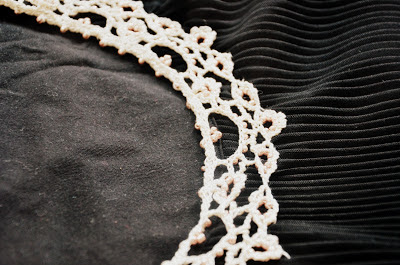
The dress off me.. I really am pleased with the beads in it. The small flowers was NOT easy on the hands, but looked great when done.


 A simple chain edging for the sleeve with 3 beaded picot after every 8 chains..


The back of the dress...

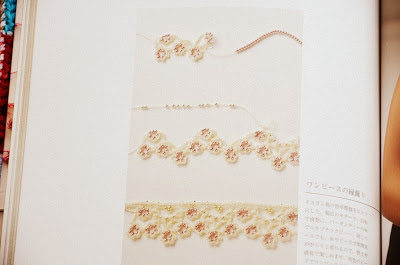
 This edging was inspired by this lovely book, Edging with beads and various Threads by Crochet Vol2. This is a Japanese book, but that is the best part of crochet right? You just need a chart and some patience and you can create magic :)

You guys want a sneak peak into this lovely book.....
Go on..read on...


You can get some more info HERE.

And a look at what is on my hook now.. Can you guess what it will become??
Something very easy, something very versatile and i am planning on a tutorial for this :)


Till then guys, see you, have a great Monday and love to all my friends and fellow crafters and bloggers who leave me such sweet kind words. It really makes handmade more lovely ♥ ♥ ♥ ♥ ♥

Love,
xxx

May 9, 2013

Overlay Mandala


My lovely people, thank you all for your wishes for my little girl, she is doing fine and is finally rash free and itching free!! Yahooooo!!

There are times when you see something floating on the internet and know that you should get going on that...Such was the time when i wanted to do a crochet mandala. I looked and looked at many pretty colorful circles, vibrant blossoms and oh so pretty mandalas. But my mind would always come back to the Overlay Mandala by CAROcreated. Somehow nothing measured up to it, in color, in design and in the look of the overlay layers.. So i got myself a little present and purchased the pattern online!!

Mind you a spoiler here :: IT IS NOT FOR THE FAINT HEARTED!!!
I found it to be a pattern for an experienced crocheter as you had to read charts and being good in maths is a plus point. Also you should know your FPs and crocheting in back loops very well. Else there will be no place to crochet the overlay layers. And frogging it when a mistake occurs only worsens the situation..

But all said and done, i  ♥ ♥ ♥ ♥ ♥ ♥ ♥ ♥ ♥ the pattern!!
It is the single most challenging bit of crochet i have ever done and i am very very proud of it :)

So are you ready for the colorful ta-daah..
Here it comes...

Overlay Mandala Ta-daaaaaaaaaaaaaaaah!!!!!!!!!!!!!!!!!!!!!!!!

 ♥ IT!
This is the back of the mandala, all threads weaved in.


 Managed to catch a glimpse of the ever eluding sun-light..


My favourite part of the Mandala. Such color bursts!


Blocked it with steam iron and framed it and it is now sitting pretty and colorful on my living room wall :)


To make this Mandala Magic :

Pattern :: I purchased the pattern from HERE. The pattern is written very well with step by step pictures at every round. Charts and worded instructions are there for every round. I preferred the charts as i could not read a single sentence spanning 5-6 lines :)

Thread :: Used Anchor Knitting Cotton in shades of rainbow.
Hook   :: 2.5mm (as suggested by the pattern)
Size      :: 20 cms approx.
Time     :: 3-4 hours of concentrated crochet, absolutely no distractions :)
Difficulty :: 3.5/5. Should know how to read crochet charts and being good at maths is helpful!
Me       :: In love and planning another one with other color combinations v v soon :)

Hope you are having a colorful crafty time.
Take care and be good, be fun and keep well...

Love,
xxx

May 7, 2013

Baby girl Blanket - WIP

Hello my dear friends!
Howz u guys, has the summer sun hit you guys yet? Its been on and off here, with bouts of rain in between.. But I am waiting for the proper summer to start and it is surprising that it hasn't yet started here.

My little girl suddenly has red rashes all over her body and i don't know what it is because of. Two visits to the doctor have not exactly been useful as the rashes go in the morning and come back later in the night. She is very uncomfortable and keeps scratching the rashes and is generally irritated at home. The doctor has adviced to stay indoors and that is proving very difficult for a outdoor person like her. Lots of games and craft at home is happening at home front and even more messy times. But seeing rashes all over her body come and go is making me a bit frustrated and am waiting to see her back to her normal self. Kids falling ill is the worse i feel, until they get well you can't do much literally as the mind keeps hovering in thoughts about them..

I haven't been crafting as much as i hoped, not as the miss is unwell, but mainly because of the little devil known as Pinterest. I have spent so much time browsing for a granny square pattern. My close friend is expecting a girl baby end of next month and i want to gift her a crochet blanket. So i had a few specifications for this blanket :

** had to be pink **
** not many holes as in a plain granny square **
** blocks and not a continuous project like a ripple **

So began the hunt...loads of hours spent in searching and trying sample squares.
Then finally i hit jackpot with my book - 200 crochet blocks for blankets by Jan Eaton.
This is a gem of a book, a must have for every blanket maker! I have picked a mix of 2 squares for this and you can see below the start of my blanket.


The layout is "Eastern Promise". I am using the corner square and square no:35 for this instead of the one recommended in this layout.

I am not planning on making the full size by more of a 6x8 squares as it is for a baby after all. Can you make out that i have started at the centre??

I so love this block. It is a three hooks block and it is a bit confusing at first, but after 1 or 2 blocks it becomes more easy. In general each block takes about 30-40 mins at a stretch and that does not include weaving in the ends.. I am happy it is a small blanket :)


Have been a good girl and decided to weave in after 16 squares. I am having way too much fun with this project. Just the right about of green and brown to give it some soul and some color. Else it is a pink riot all the way!


 Also, i went ahead and for the first time purchased the famous overlay mandala from CAROCreated HERE.

Will be having a crack at this soon, as soon as my house is alseep and i have all the time and space for myself!

Till then, happy crafting my lovely friends and do write in and let me know if you have every purchased paid patterns and did you feel it was worth it?

Love,
xxxxxxxxxxxxxxxxxxxxxx